RefX01 Mech Head Bust

I’ve been working on this guy since I got back from Macau and it’s my first MOC (My Own Creation) for 2016. It’s essentially a large scale model of a reFrame head design I’ve had lying around for a while. I really liked the head design but never got around to creating a full mech build for it so figured I’d make it into one a large head bust instead like the Gundam head busts.
reFX01 Head Bust

More pictures of the finished build here (Flickr album) and below is a 360 video of the entire build.


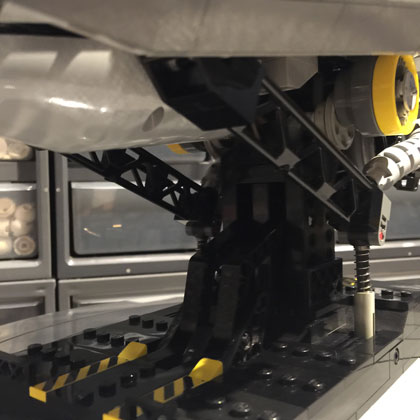
The build itself started with just the head, with me figuring out how I’d create something with so little detail (the original scale head) into a more detailed output. The biggest issue here was trying to maintain the proportions of the pieces while adding more detail into it. I’m also not used to building at this scale and had to keep solving weight and stability issues as I went along.

Below is an almost step-by-step process of how I made the entire thing. You can comment below if there’s something you’d want a closer picture of.

1-early-version
The early version of the head. The build was unstable at this point as I didn’t use a sturdier frame for the inside of the head. Also, this was a lazy base design 😛
2-eye-piece-with-light-brick
The eye piece has a 2×3 3rd party light brick (color white). Wish it was much stronger though as the output isn’t that bright.
3-forehead-inside-attachment
This is the underside of the forehead piece and the swivel plates actually connect to a 1×2 modified brick with 2 studs on each side.
4-top-pic-of-head-frame
Top side picture of the head in progress. The top of the pic is the forehead piece attached, the sides being the antennae piece and side flaps, and the bottom is the back detail.
5-bottom-of-head-frame-with-side-panels-and-eye-removed
Another breakdown pic. This time from the bottom of the build. At this point, the head build is around 60%, lacking the neck connection, the top side to cover the rest of the head, and the circular pieces under the “antennas”.
6-side-view-of-unfinished-head-and-frame
The neck attachment is actually a rotating gear assembly so the head could swivel a bit when completed. I’m also creating a raised area where the head cover would go.
7-creating-the-top-assembly
Left: The cover piece for the rest of the head. I had designed it to be mounted via the 2×10 plate on the 9 stud elevated structure on the head.
8-finished-head-side-view
Finished head side view. Now with the cover attached and the extra circular design under the antennae.
9-fin-head-angled-front
The front of the completed head.

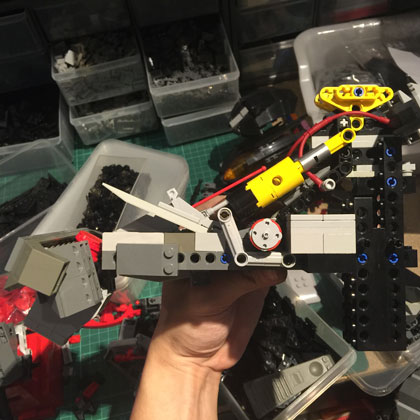
At this point, I was quite worried that the neck attachment being just that smaller rotating gear wouldn’t quite hold given the weight of the entire head build. Due to that light brick, the position of the neck was off from the center of gravity by around 1-2 studs back but I didn’t want to remove the light brick feature so I just winged it. Next was figuring out how to design the neck and collar area.

I actually had to do some bit of referencing here as I only had a vague idea of neck details of mechs. Searched for the G-System 1/32 scale Gundam busts and the Zeta bust was an ideal model to study, showing the right amount of machinery detail that I was after.


10-creating-the-neck
Started the neck build by designing the front hydraulics that would mimic human tendons and muscles that allow the neck to move.
11-initial-fitting
An initial fitting. Notice that the picture is actually upside down as I couldn’t really place the heavy head on top of the unfinished neck build at this point 😛
12-expanding-the-neck-details
Continuing the neck details and developing the rest of the bust. The front piece is a huge chunky old dark grey piece that I used in the earlier version of the base.
13-creating-more-details
The front side section. Wanted to give it a frame like look so used that support piece to make it look more industrial.
14-side-view-progress-and-frame
Side view showing the liftarm frame. This was a technique I learned when I was making the Himinioðurr Dropship and is essentially the way SHIP builders create their sturdy inner frames.
15-getting-there
Back view of the design progress. At this point I was working mostly on the side neck details as I wanted to conceal the frame as much as possible.
16-side-of-neck-to-cover-the-frame
These pieces would give shape to the side of the neck and also hide the liftarms.
17-testing-light-brick
Turning on that light brick. I wish I built this a little smarter since turning on the light brick requires me to remove the eye assembly, switch on the brick, and return the eye. Was hoping to just press something and it’d turn on.
18-done-but-should-have-finished-base-first
The finished head and neck/collar details but still lacking base and rear details.
19-back-details
I have to admit that this is probably the sexiest part of this entire build. The main back piece was recycled from the earlier base then I attached these wire assemblies that just snaked around a core-like contraption (using those huge drill wheel pieces).
20-base
All that was left was to tidy up the base and add a little more detail. Used these railed pillars and technic shocks just to complete the whole interior industrial look. Had a ton of collectible minifig base plates lying around so decided to use those to cover up the rest of the base.

Hope you liked the breakdown of the entire build process and feel free to leave a comment below if you have any questions about it 🙂 Now to actually build the reFrame for this guy.

2 Comments


  1. can i buy this ,thank you

Leave a Reply to smalloldbullCancel reply

This site uses Akismet to reduce spam. Learn how your comment data is processed.